Appearance
GitHub Actions 必知必会
Helloworld
创建文件 .github/workflows/helloworld.yaml
yaml
on: push
jobs:
checkout-files:
runs-on: ubuntu-latest
steps:
- run: pwd
- run: ls
check-node-version:
runs-on: ubuntu-latest
needs: checkout-files
steps:
- run: node -v
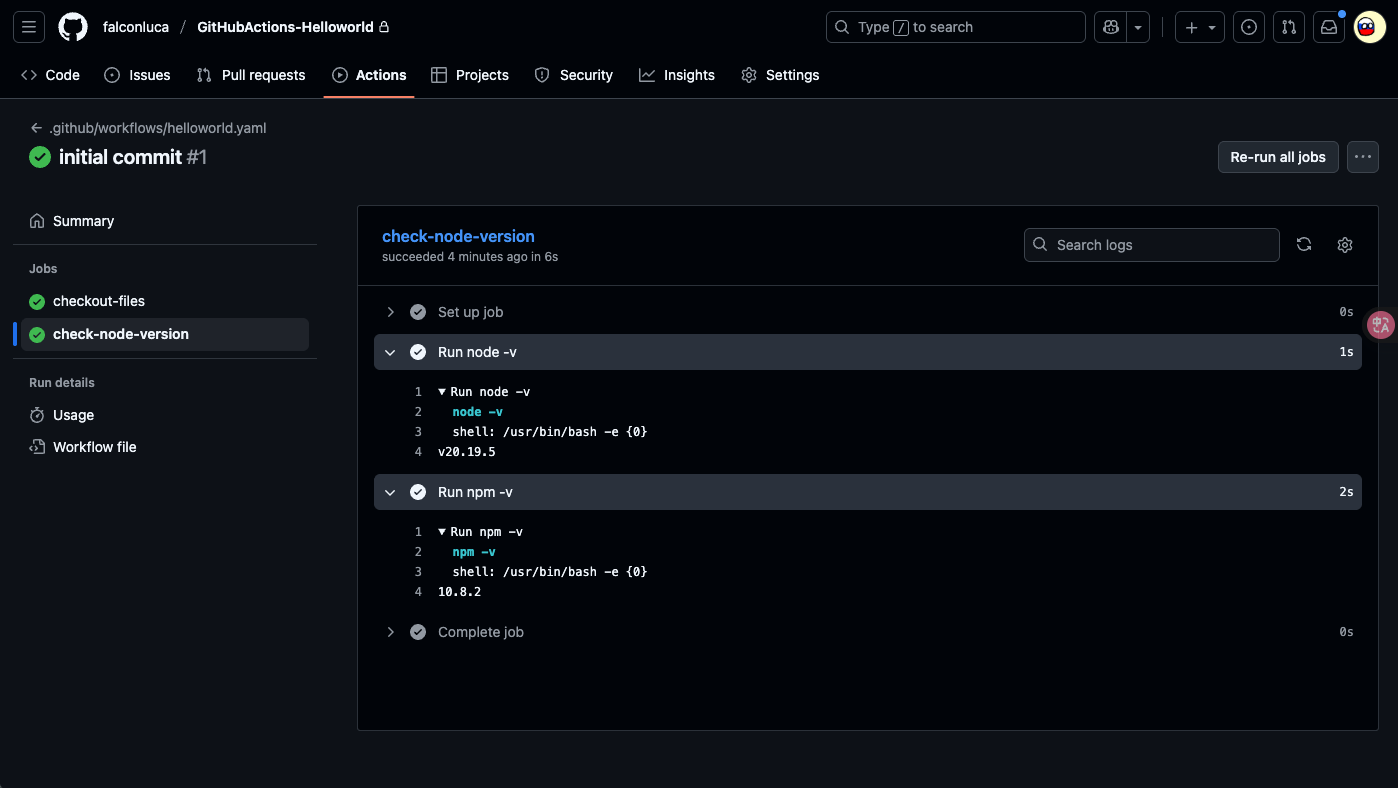
- run: npm -v将代码 push 到 GitHub 之后,CI 会自动触发,可以看到我们的 Helloworld 工作流成功了!
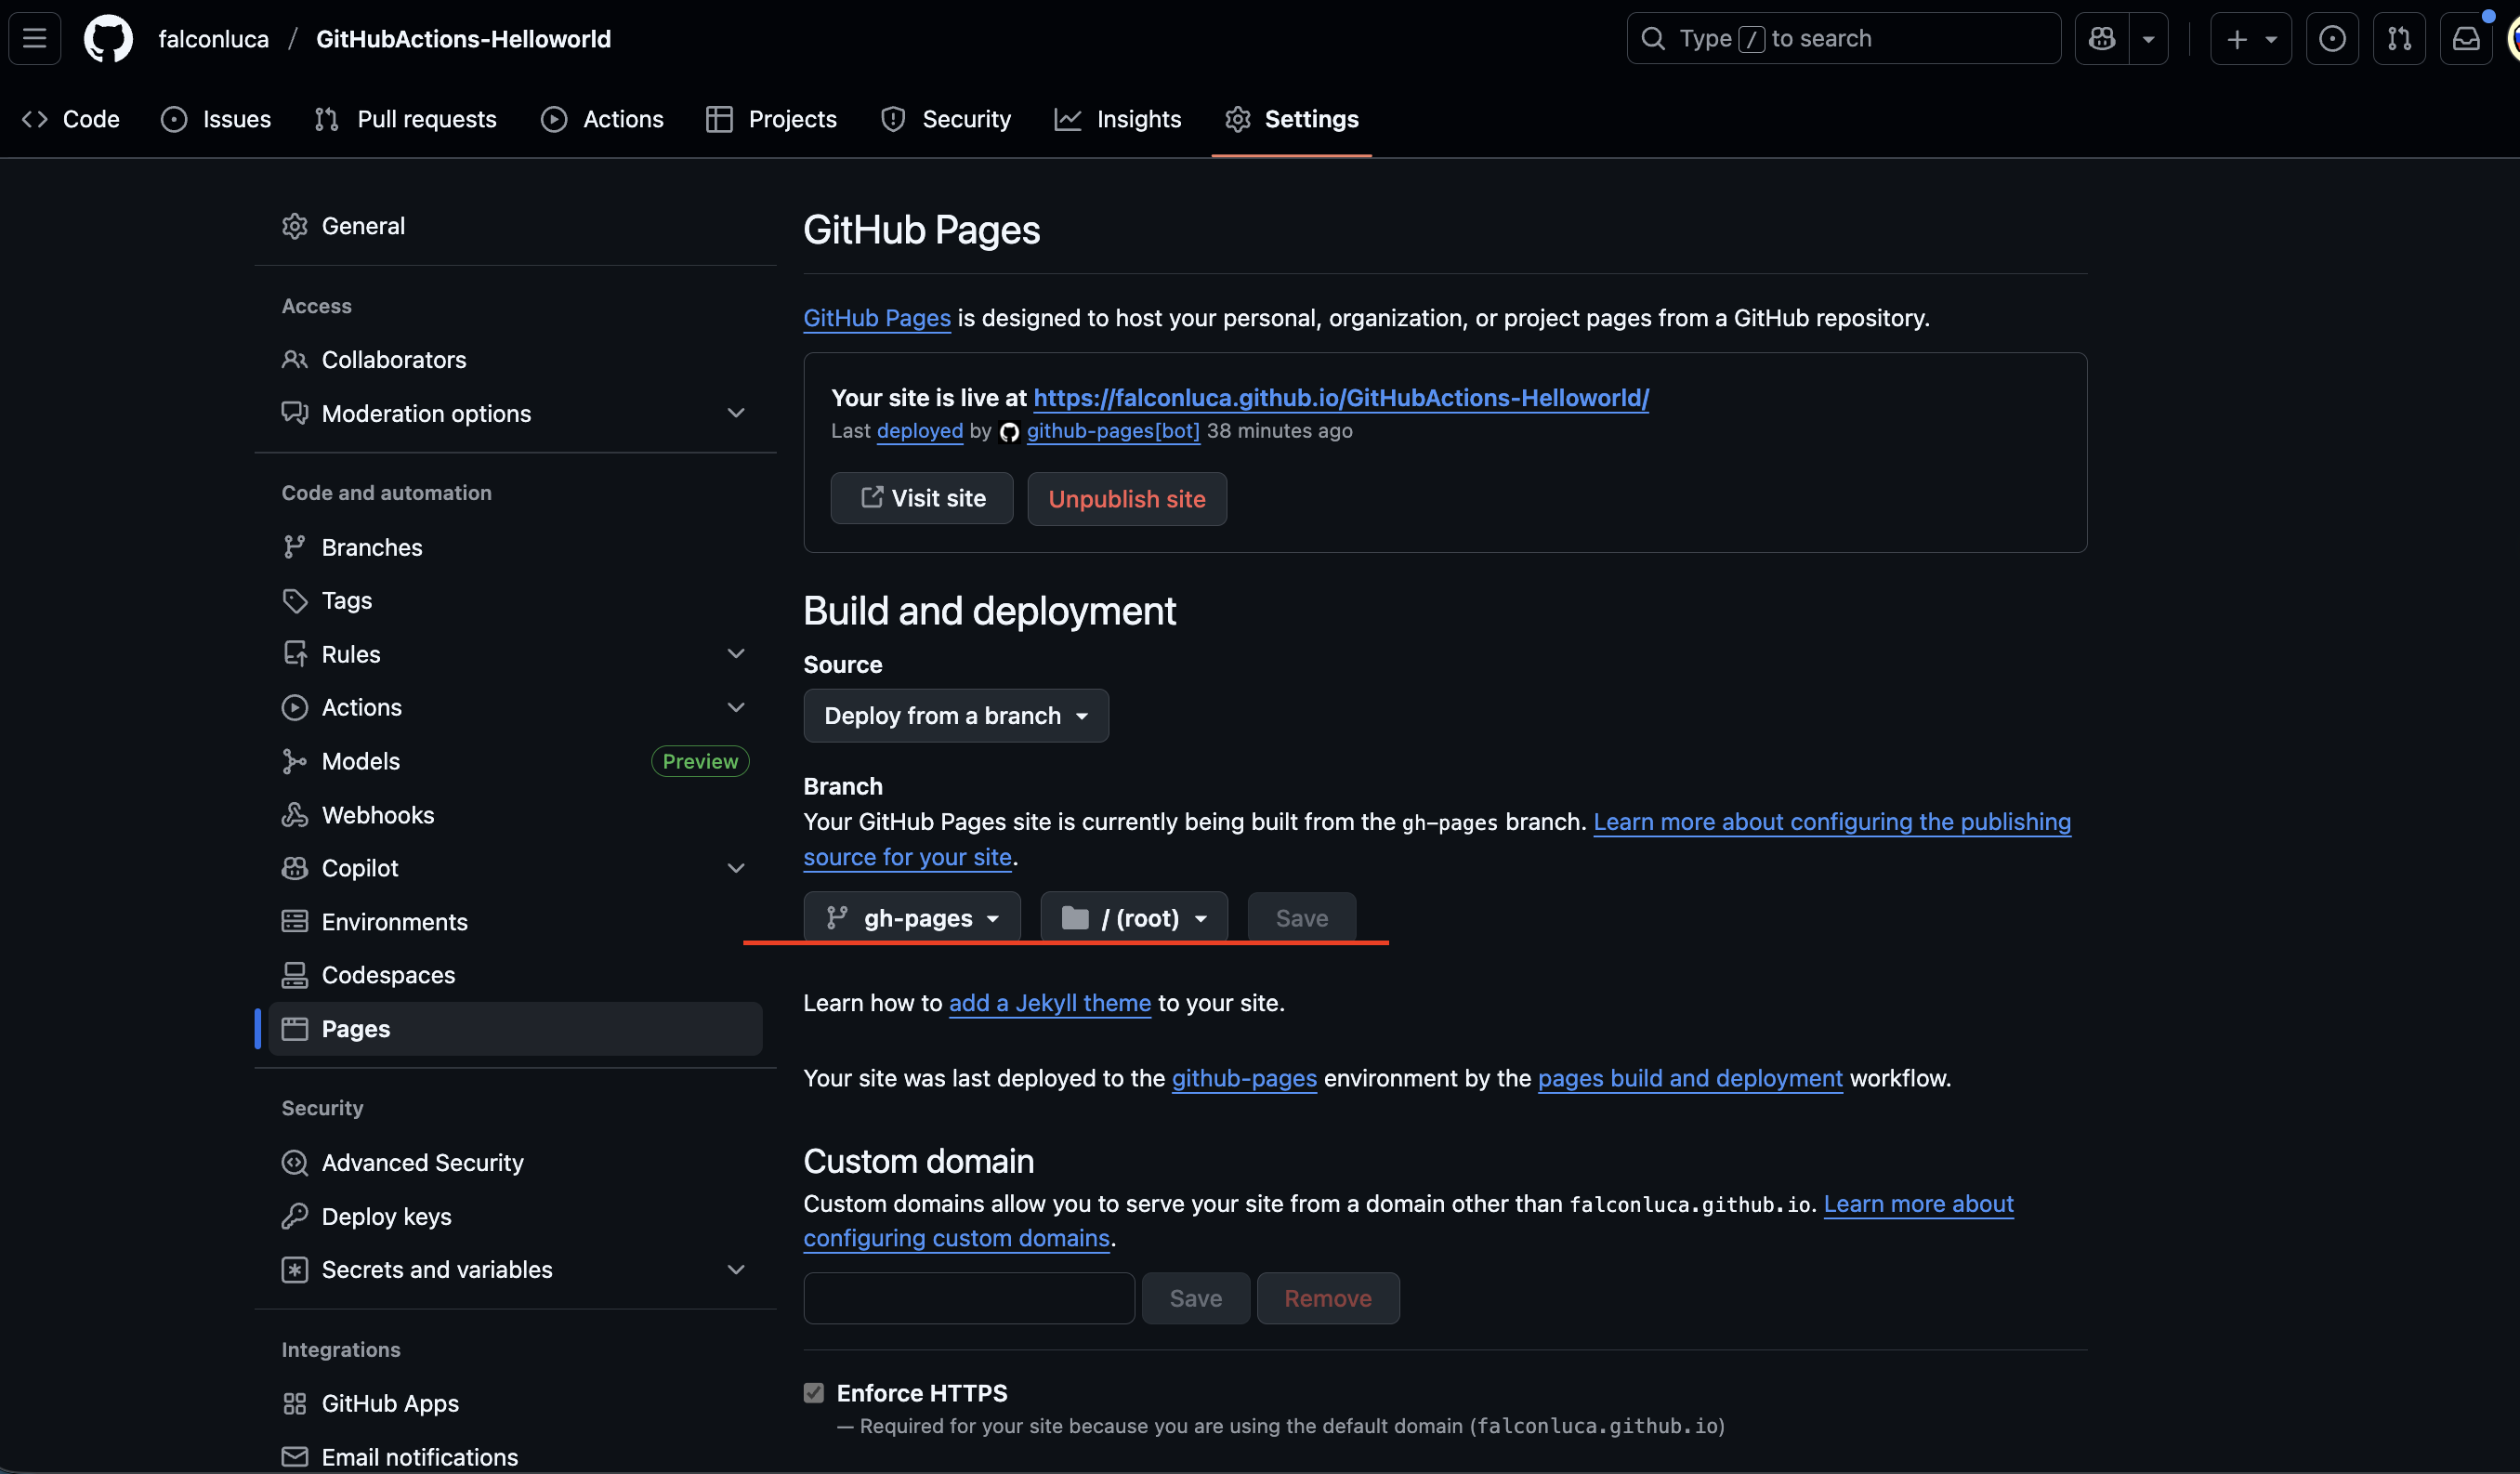
部署 Next.js 服务到 GitHub Pages
Details
yaml
on: push

permissions:
  contents: write

jobs:
  build-next:
    runs-on: ubuntu-latest
    steps:
      - name: 切换到代码根目录
        uses: actions/checkout@v4

      - name: 安装依赖
        run: npm i

      - name: 构建 next 项目
        run: npm run build

      - name: 检查构建结果
        run: ls -al

      - name: "部署到 GitHub Pages"
        uses: JamesIves/github-pages-deploy-action@v4
        with:
          branch: gh-pages
          folder: out
记得在相应的仓库中配置 GitHub Pages
构建并推送镜像到 DockerHub
编写 Dockerfile
dockerfile
FROM node:20-alpine

WORKDIR /app

COPY package.json .

RUN npm install

COPY . .

RUN npm run build

CMD ["npm", "start"]
工作流配置
yaml
on: push
jobs:
build-next:
runs-on: ubuntu-latest
steps:
- name: 切换到代码根目录
uses: actions/checkout@v4
- name: 登录 DockerHub
uses: docker/login-action@v3
with:
username: ${{ secrets.DOCKER_USERNAME }}
password: ${{ secrets.DOCKER_TOKEN }}
- name: 构建并推送镜像到 DockerHub
uses: docker/build-push-action@v5
with:
push: true
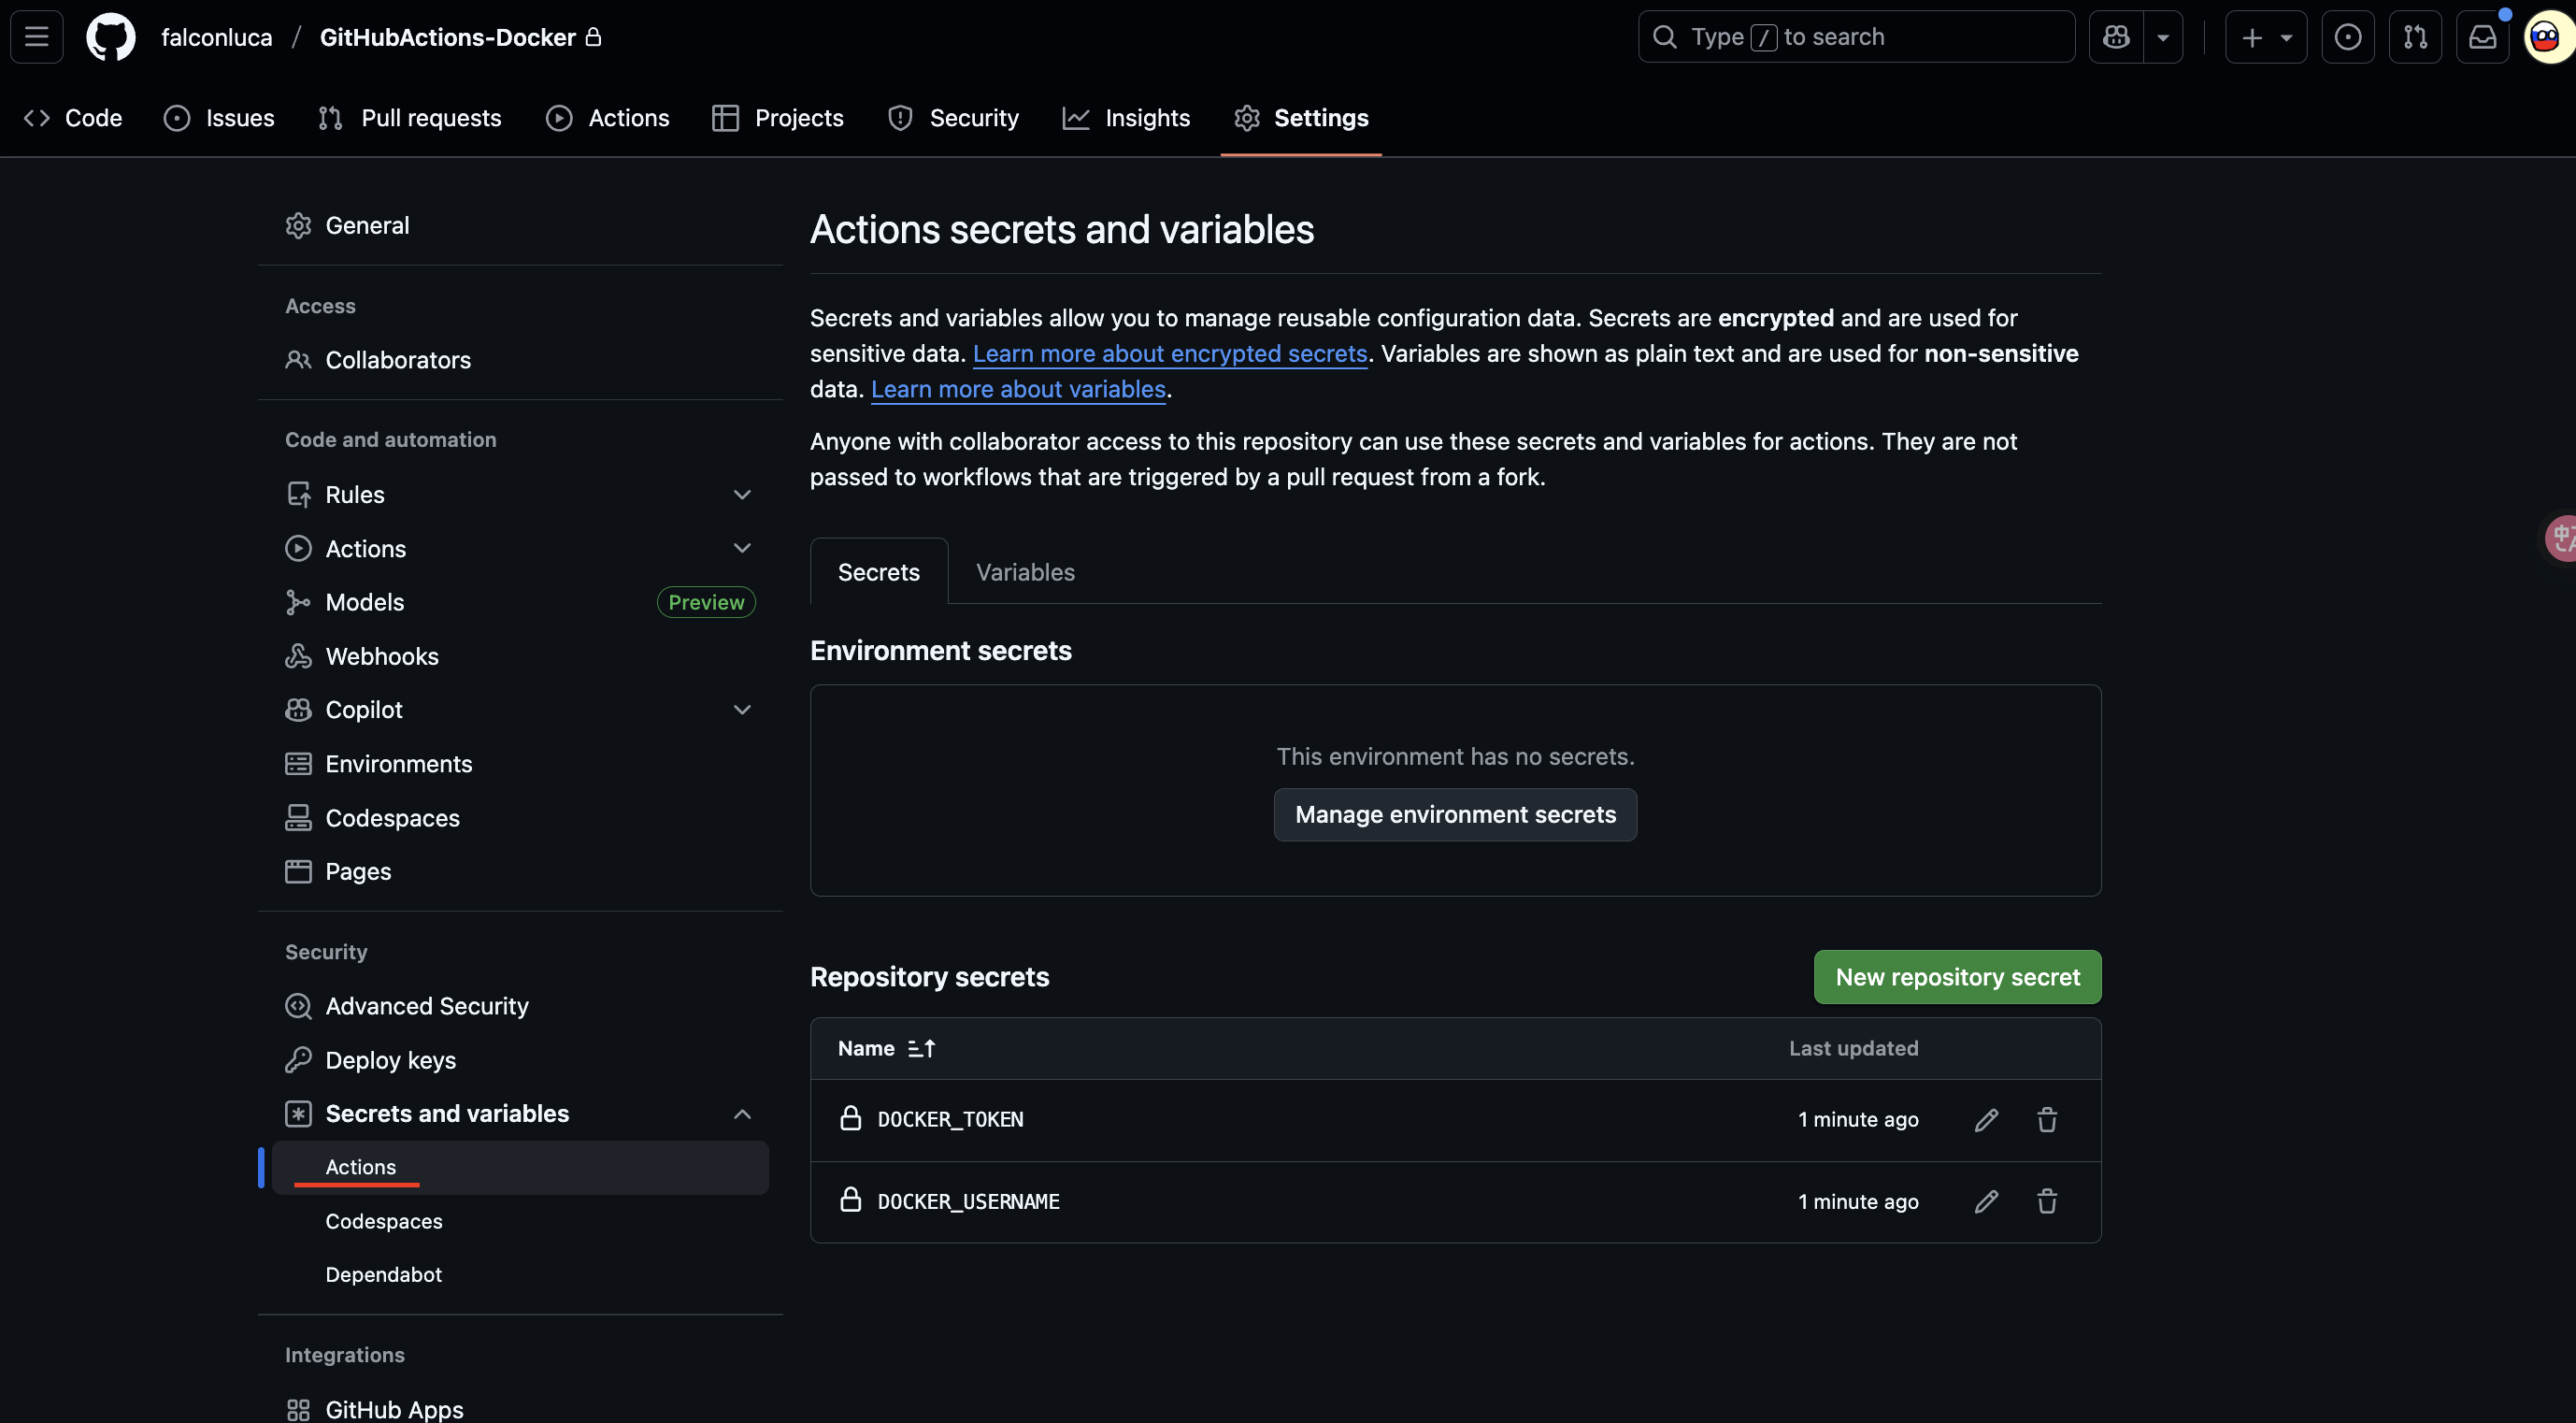
tags: ${{ secrets.DOCKER_USERNAME }}/githubactions-docker:latest设置 GitHub Actions Secrets
工作流执行成功之后,最后我们来本地验证下容器,启动之后访问 http://localhost:3001
sh
docker run -d -p 3001:3000 shaohsiung/githubactions-docker部署 API 服务到云服务器 - api-go 案例
GitHub Actions 自动:
- 在云端构建 Go 项目
- 上传并部署到云服务器(systemd 重启)
- 通过钉钉通知上线成功
.github/workflows/deploy.yml
yml
name: Deploy Go Web API

on:
  push:
    branches:
      - master

jobs:
  deploy:
    runs-on: ubuntu-latest

    steps:
      - name: Checkout code
        uses: actions/checkout@v4

      - name: Set up Go
        uses: actions/setup-go@v5
        with:
          go-version: "1.24.2"

      - name: Build app
        run: |
          GOOS=linux GOARCH=amd64 go build -o api-go main.go

      - name: Package binary
        run: |
          mkdir -p deploy
          mv api-go deploy/
          tar -czf api-go.tar.gz -C deploy api-go

      - name: Upload to server
        uses: appleboy/scp-action@v0.1.4
        with:
          host: ${{ secrets.SERVER_HOST }}
          username: ${{ secrets.SERVER_USER }}
          key: ${{ secrets.SERVER_SSH_KEY }}
          source: "api-go.tar.gz"
          target: "/root/bin/"

      - name: Remote restart service
        uses: appleboy/ssh-action@master
        with:
          host: ${{ secrets.SERVER_HOST }}
          username: ${{ secrets.SERVER_USER }}
          # 必须是「私钥」,不是公钥
          key: ${{ secrets.SERVER_SSH_KEY }}
          script: |
            cd /root/bin
            tar -xzf api-go.tar.gz
            rm api-go.tar.gz
            sudo systemctl restart api-go.service
            echo "✅ 服务已重启"
配置 Nginx 反向代理 https://api.xxx.cn/v3 到 http://127.0.0.1:8081
conf
server {
    listen 443 ssl;
    listen [::]:443 ssl;
    server_name api.xxx.cn;

    ssl_certificate     /etc/nginx/conf.d/cert/api.xxx.cn/api.xxx.cn_bundle.crt;
    ssl_certificate_key /etc/nginx/conf.d/cert/api.xxx.cn/api.xxx.cn.key;
    ssl_session_timeout 5m;
    ssl_protocols TLSv1 TLSv1.1 TLSv1.2;
    ssl_ciphers ECDHE-RSA-AES128-GCM-SHA256:HIGH:!aNULL:!MD5:!RC4:!DHE;
    ssl_prefer_server_ciphers on;

    # 新增 /v3 反向代理到本地 8081
    location /v3/ {
        proxy_pass http://127.0.0.1:8081/;   # 注意末尾斜杠
        proxy_set_header Host $host;
        proxy_set_header X-Real-IP $remote_addr;
        proxy_set_header X-Forwarded-For $proxy_add_x_forwarded_for;
        proxy_set_header X-Forwarded-Proto $scheme;
        proxy_set_header X-Forwarded-Port 443;
    }

    location / {
        proxy_pass http://10.254.66.199:80; # ingress-nginx
        proxy_set_header Host $host;
        proxy_set_header X-Real-IP $remote_addr;
        proxy_set_header X-Forwarded-For $proxy_add_x_forwarded_for;
        proxy_set_header X-Forwarded-Proto $scheme;
        proxy_set_header X-Forwarded-Port 443;
    }
}

server {
    listen 80;
    listen [::]:80;
    server_name api.xxx.cn;

    return 301 https://$host$request_uri;
}
验证配置并重启 Nginx
sh
nginx -t
nginx -s reload
使用 systemd 管理服务
Details
创建 systemd 服务文件 /etc/systemd/system/api-go.service
ini
[Unit]
Description=Go Web API
After=network.target

[Service]
# 用哪个用户跑,没专门用户就直接 root
User=root
Group=root

# 工作目录(放你二进制的地方)
WorkingDirectory=/root/bin

# 启动命令
ExecStart=/root/bin/api-go

# 程序挂了自动重启
Restart=always
RestartSec=5

# 你要的环境变量(比如监听端口)
Environment=PORT=8081

[Install]
WantedBy=multi-user.target
加载并启动服务
sh
# 重新加载配置,不会影响其它服务
sudo systemctl daemon-reload

# 启动服务
sudo systemctl start api-go

# 设置开机自启
sudo systemctl enable api-go
检查运行状态
sh
sudo systemctl status api-go查看实时日志
sh
journalctl -u api-go -f后续发布部署流程
- 上传新的二进制 → 覆盖
/root/bin/api-go编译后的可执行文件 - 执行:
systemctl restart api-go.service服务就会平滑更新,日志都能看见
nginx 的“斜杠魔法”
Details
1.末尾加 /
nginx
location /v3/ {
    proxy_pass http://127.0.0.1:8081/;
}| 请求路径 | nginx 转发到 | Go 服务收到 |
|---|---|---|
| /v3/foo | http://127.0.0.1:8081/foo | /foo ✅ |
| /v3/bar/baz | http://127.0.0.1:8081/bar/baz | /bar/baz ✅ |
✅ 好处:去掉
/v3/前缀,Go 服务不需要改路由
2.末尾不加 /
nginx
location /v3/ {
    proxy_pass http://127.0.0.1:8081;
}| 请求路径 | nginx 转发到 | Go 服务收到 |
|---|---|---|
| /v3/foo | http://127.0.0.1:8081/v3/foo | /v3/foo ❌ |
| /v3/bar/baz | http://127.0.0.1:8081/v3/bar/baz | /v3/bar/baz ❌ |
❌ 缺点:Go 服务路由必须带
/v3/前缀,否则匹配不到
核心结论
- 保留 Go 服务原始路由 →
proxy_pass .../(末尾有/) - Go 服务要自己处理 /v3 →
proxy_pass ...(末尾无/)
总结一句话:nginx 末尾斜杠 = “去不去掉 location 匹配前缀”,Go 路由要不要改全靠它